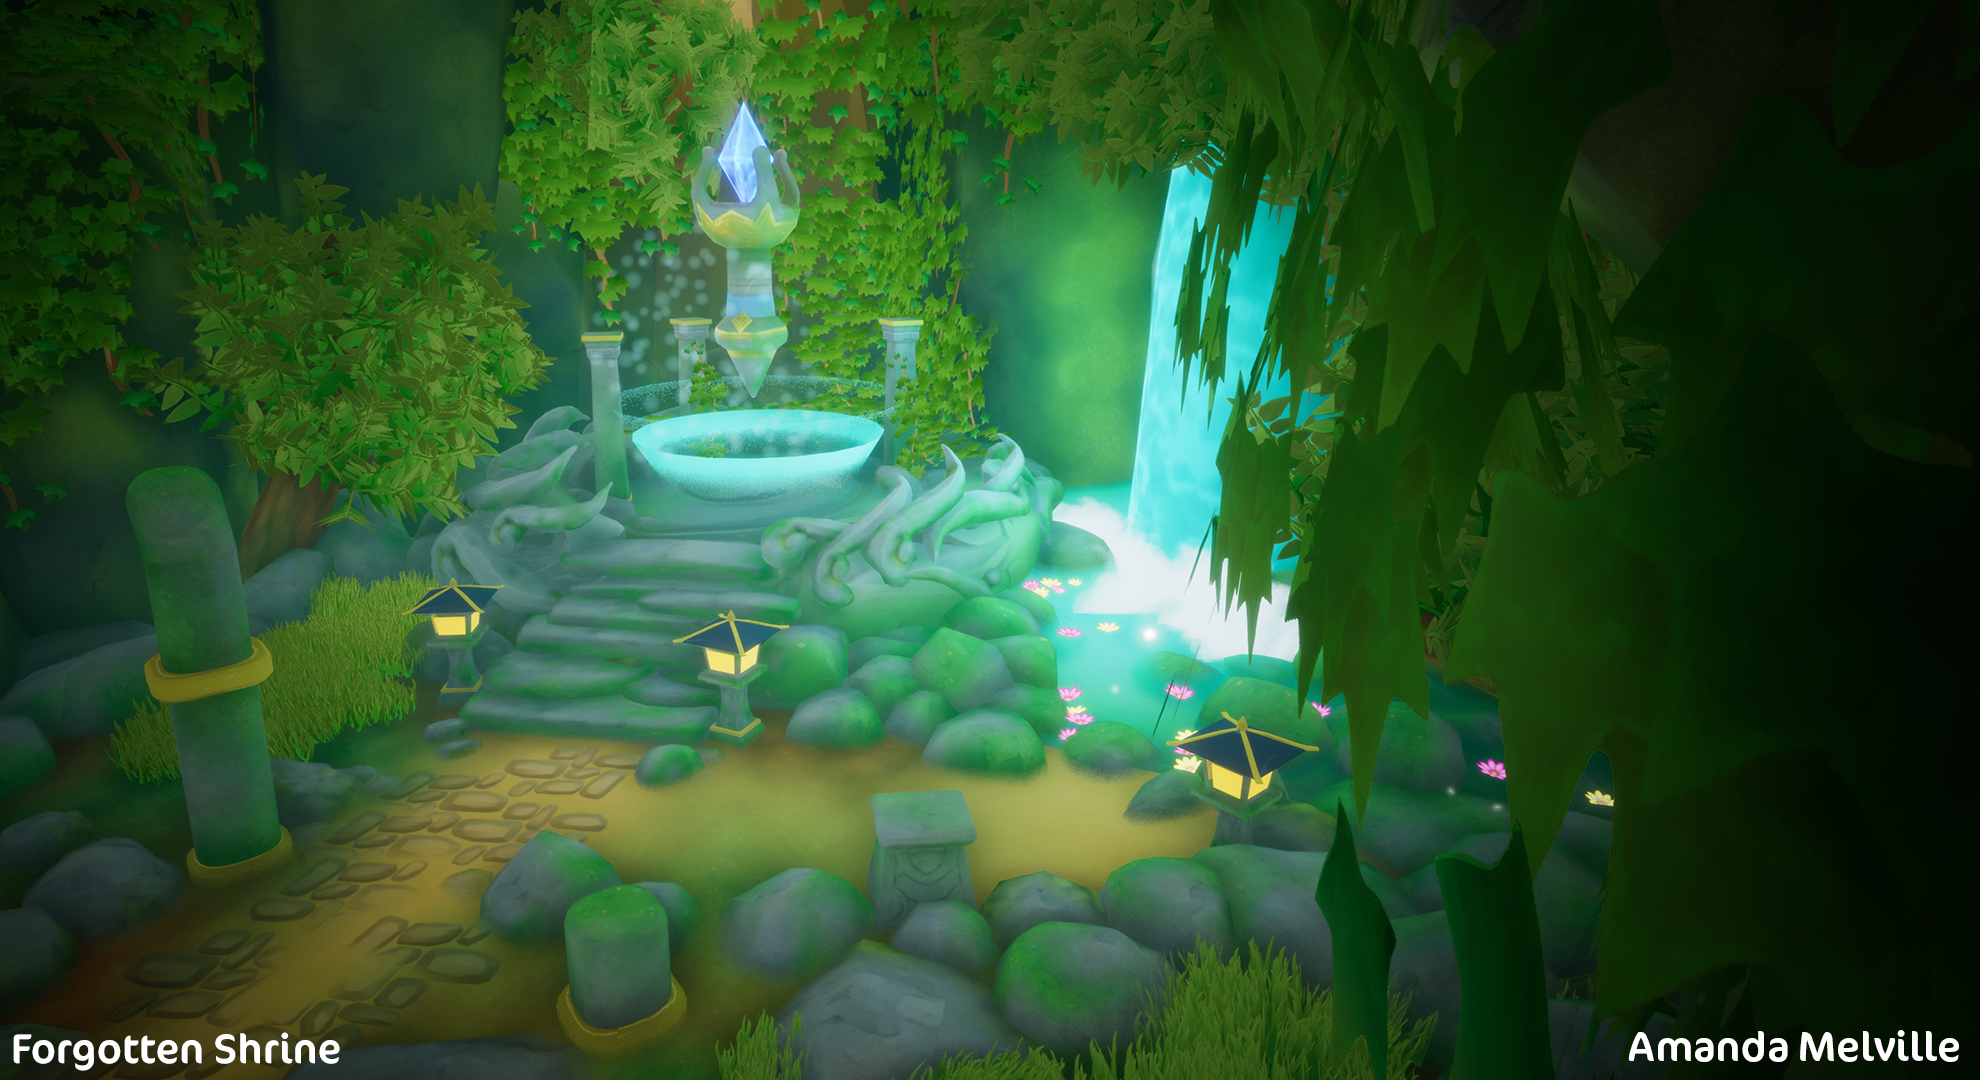
Forgotten Shrine — Project Breakdown

Intro
Hello & Welcome! My name is Amanda Melville, a 3D Environment & Prop artist from Detroit, Michigan. I’m currently a senior studying in game art at College for Creative Studies. I have a background with an associate degree in graphic design as well!
I started learning 3D in 2019, through the journey of discovery in the game development world I ended up being drawn to stylized worlds. My current focus is now to hone in my technical and creative abilities to create story driven portfolio pieces. My hopes, with graduation rapidly approaching, is to find an internship for the spring / summer of 2022!

Overview & Goals
The premise of this project was being able to create an environment that was focused on studying and recreating Genshin Impact by miHoYo studios. As I was breaking down how and what makes Genshin Impact so defined as a style, I was also mindful of how they use technical skills to create the environments as well.

The initial start of this project was daunting for myself. Being that I was instructed to create the concept on my own, without using made concept art or scenes in the game. This was a huge obstacle for myself to overcome with understanding how to combine my idea with assets already existing. Being that this was something I was struggling with, I will say I learned quite a bit understanding the style.
I decided with this in mind and the time frame I had for the project, I focused a lot on modular techniques. Creating and reusing tileable textures and trim sheets; with using Substance Designer, Substance Sampler, and Photoshop. I was able to convey the style much more accurately while refining my workflow. I also was able to reuse a lot of the same assets in the scene to fill it and give much more depth overall (thank you foliage). In this scene I also utilized quite a bit of vertex painting for my static meshes and landscape. I wanted to be able to mix up the textures I had made with the grass and moss material to have the scene feel more lived in, so to say.

I took advantage of the Genshin Impact style to focus on the use of particle effects in Unreal Engine 4. When I was breaking down the style and immersing myself in the game, I noticed that miHoYo studios utilize particle effects to direct players where they want to go, while giving a magical environment for the player.
Starting the Scene
First thing is first, I needed to gather up my references and get ideas started for the concept. Something that I thought would be beneficial to creating the concept is breaking down what makes Genshin Impact so recognizable. I found that playing the game is helpful in getting any angles you may want.

With this project I wanted to take advantage of the knowledge I had in Unreal Engine to create high resolution renders and use VFX to breathe life into the scene. Also using the technical skill set I have in Maya, Substance Painter, Photoshop, Zbrush, Substance Sampler, and Substance Designer to refine my game ready workflow.

Starting the scene was at first daunting, but whenever I began to feel stuck, I had multiple references to help guide me and take a step back. Bird House: Working on a Stylized Landscape in UE is an iconic article from Jasmin Habezai-Fekri that I’m sure all of us have read. This article has a well put format with a lot of beneficial tips and tricks throughout it.
I also referenced this YouTube video with Jasmin discussing one of her more recent projects, Hippo Sanctuary. I love just watching this video specifically because it helps me stay focused in what workflow / steps I need to take rather than finding myself stumped or “stuck in a rut”.
Creating a Stylized Medieval Town in 3ds Max by Silke Van Der Smissen, Substance & Unreal is inspiring to say the least, this article had my momentum push me through to the end. Stylized Tiling Texture Workflow by Andrew Harrington helped with keeping me mindful of staying stylized.
Concept & Blockout
I knew when I started this project and considering the concept, I wanted the environment to be in a cave setting while the main focus being a shrine / crystal of some sort. When sketching together concepts in Photoshop I was also mindful of composition, and how I can use the environment to my benefit with framing the focal point.


When I had some type of idea of what I wanted to create I then began the block out phase in Maya 2022. Making sure of being mindful of the scale and shapes I was using, I put together a basic idea of where I wanted to move forward. Looking back on it, I would’ve done a couple of draw overs on the blockout screenshots I took in Maya. Just to have a more refined idea of next steps and how everything would look placed in the scene.

Once I had a rough blockout of my scene, I took everything into the Unreal Engine. I find this valuable just to start placing cameras in the scene and building the scene around that. This helps just ensure I stay to a reasonable scope and don’t get too ambitious with the project.

I also take the chance to focus on lighting for the scene. I was able to start better understanding how to use lighting to my advantage. I’ll dive a bit deeper into lighting in Unreal Engine a bit later on.

Zbrush — High Poly Mesh
After getting the blockout into the scene I did a bit of work in Zbrush to add detail. I used this process for some of the assets, the hero asset, trim sheet, and even the foliage! I used to dislike Zbrush but now it’s my go to for adding any detail on a high poly mesh.
I personally like using this workflow of starting the foliage off in Zbrush just to give the leaves a bit more depth before baking on a plane. Especially since Genshin Impact has a way of having very minimal detail on most of the foliage.
A good way of starting meshes in Zbrush is using the ShadowBox tool! I think you can get really specific shapes with just the use of the mask tool. Put the LazyMouse option on and activate symmetry and getting the base shape of foliage gets really simple.

Getting the base shape from using the ShadowBox feature made it really easy to move forward with inflate and move brush to start getting a bit more depth with the shape. Moving everything in the desired shape and for the majority of the high poly creation. I made sure to use the symmetry option to reduce a bit of work. After getting the foliage put together, I then went through and created a bit more uniqueness, so everything wasn’t perfectly symmetrical.

Texturing

The main focus here was trying to recreate the Genshin Impact look with the textures. While studying and breaking down the look it seemed like a cel-shader was applied to foliage and player characters and stylized PBR / hand painted textures for the rest. With this in mind I looked up a couple of timelapse videos from 3dEx on YouTube to gather some reference. The videos I referenced were:

Substance Designer — Stylized Sand Material
Substance Designer — Stylized Moss Material
Substance Designer — Stylized Dirt Material
Substance Designer — Stylized Ground Texture
Before diving too deep into creating any textures, I decided to do a quick paintover in Photoshop, breakdown of textures from in game, and what I came up with for the concept. This gave me an idea and direction to move forward with what textures I can tile, what works better as a unique texture, and what I need to make in UE4.

I started all of my textures in Substance Designer, then took the results into Unreal Engine to see how everything is laying out. Not getting the results I wanted I decided to change my workflow up a bit to something I was a bit more comfortable with, Photoshop.

To also make sure that everything appeared to be working well in a tileable texture and that there weren’t any seams, I made sure to turn on Pattern View and check seams by using the Offset Filter. Even though Designer keeps things pretty good at staying seamless, this is just an insurance step. Also, with making all the revisions these additional steps gave me reassurance that everything was tiling properly.

Having the base texture created in Designer while referencing the tutorials, I then brought it into Photoshop for cleanup and gave it more of a painted feel to help stay within the Genshin Impact style.

Lighting
Lighting in Unreal Engine is something I’ve always had a challenge with. I took advantage of this with this project by diving deep into tutorials and articles breaking down what each light does within the engine. I did try to keep it as simple as I could, but I still wanted to keep the feel of a cave. Something I have always struggled with is lighting, especially in Unreal Engine. But with the use of many free and amazing tutorials such as:
HDRI Prop Lighting in UE4 by JoAnn Patel
How To Light Exteriors — Dynamic Lighting [Unreal Engine 4 Tutorial] by Willian Faucher

The biggest obstacle I overcame with lighting was not overloading the scene with lights and losing the darker shadows that gives it the cave feel. I mostly relied on a sky sphere for most of the lighting but added a couple of directional lights near the god rays, and a few point lights to highlight more areas I wanted more attention to.

I decided a bit later on in the project to really overcome my struggles with fog in the scene. A lot of going back and forth between post process and fog to really get the correct feel was a bit of an ache but ended up being much more worth it with just a little bit of fog.

When I added the Exponential Height Fog, I also utilized the Atmospheric Fog attached the height fog. This gave a bit more focus to the main prop of the scene as well as the water. It also gave more of a mystical, magical feel.
Adding Life — Particles & Subtle Animation
I wanted to give some extra detail in the scene by utilizing Unreal’s particle systems and panner nodes in the material blueprints. I focused on a movement near the hero prop, steam particles near the waterfall, water slighting moving, some wind action on the foliage, and falling leaf particles from the ivy.
So quite a bit was added! Initially I wasn’t planning to focus on this much with subtle movement in the scene. However, I find it quite therapeutic to use nodes to create life in a scene. Being able to enhance your scene with these effects is something I try to learn and grow with in each environment project that I can.
There are quite a bit of tutorials I used to know where to begin. As much as I find pleasure in this aspect of the project, I usually find myself stumped without using a tutorial as a guide. Pretty much “frankensteining” my materials and particles to what I wanted to create.
I did also focus on some vertex painting, which is an extremely useful tool in Unreal Engine. This essentially allows you to be able to take two separate materials and paint which texture / how much of the desired texture to come through. Really can get some quick, unique texturing on 3D models!

Here’s a tutorial to understanding and learning a more about vertex painting in Unreal. If anyone is a veteran of the engine, or even just starting to dabble in, I think this is a great practice that can really make a scene or object more dynamic.

As I mentioned previously, I did use some celshading effect in the post process volume. I only had the celshading affecting the foliage in the scene because when I was studying Genshin Impact that was one of the biggest things that stood out. That the only thing with any effect applied with celshading were foliage and characters.
This tutorial embedded above is really resourceful with breaking down the process of setting everything up! I really thought it would be a difficult process, but with the guidance of the artist and explaining what’s going on, it makes it fairly easy to retain and use this information in your own interpretation.
The biggest struggle with the effects I had was that when I was using Movie Render Sequencer in the engine, I found that my particles weren’t showing up nearly the same as they were in the viewport of the project.
The solution I managed was cranking up the particle constants and extending the lifetime in the movie render queue (under anti alias) to 32 or 64 for warm up frames.
Final Thoughts
Overall, this project had quite a few obstacles that were daunting at first but taking the opportunity to face them and learn throughout the way was beneficial to say the least. The first initial challenge being creating my own concept from studying and breaking down a specific game to recreate. Then along the way I had challenges to overcome with lighting, ambience, and post process in Unreal. Luckily, with my professor’s, Adam Serhane, guidance and an abundance of information online I was able to learn and take away much knowledge throughout this project.
Also, special thanks to Lucas Annunziata for reaching out and taking the time to give me feedback! It was extremely insightful to learn and utilize different aspects of Unreal Engine that I wasn’t familiar with. With a short amount of time and the feedback given I was able to take the project to a whole additional level! I was able to take these challenges and use them to become more efficient as an artist.
Thank you for taking the time to read & looking through my article!
Amanda Melville, Environment Artist
Email — amandamelville00@gmail.com
