Demon Sword: Creating a Stylized Prop
Introduction
Hello & Welcome! My name is Amanda Melville, a 3D Environment & Prop artist from Detroit, Michigan. I’m currently a senior studying in game art at College for Creative Studies. I have a background with an associate’s degree in graphic design as well!
I started learning 3D in 2019, through the journey of discovery in the game development world I ended up being drawn to stylized worlds. My current focus is now to hone in my technical and creative abilities to create story driven portfolio pieces. My hopes, with graduation rapidly approaching, is to find an internship for the spring / summer of 2022!


Overview & Goals
For this project I wanted to focus on creating a 3D stylized prop based off of a concept for a game ready asset. Keeping in mind optimal workflow, checking values, and sizing throughout the process. The main goal was to recreate a concept as closely as I could to the original found concept.
I spent a little bit of time breaking down the concept of the project. I wanted to make sure I had a good understanding of the sword itself. From the color palette, to base shapes, and breaking down how the textures will be applied.
Another focus of mine throughout this project was refining my skillset with stylized PBR textures.
Considering these aspects in the beginning of any project helps me understand the scope of the project with much more clarity.
The main programs I used for the program were Autodesk Maya 2022, Adobe Substance 3D Painter, Photoshop, Zbrush, Marmoset Toolbag 3, & Unreal Engine 4.27.1.
*Note* Please be mindful there is not necessarily a right or wrong way of going about 3D modeling. This is just the workflow I use and the tools I utilized.

Break down of my draw overs / planning of the concept (Screenshot from Miro Page)
Starting Out: Block Out & Mid Poly

Initially, I started the block out with planes to get the front view of shapes right of the entire mesh. Later down the road this workflow does cause a couple of revisions. Since everything was made with planes rather than the base primitives shapes (how the teeth are cylinders) it made the side view feel very flat and ended up being more work than just working with the base shapes.
The first things I usually do while setting up a project in Maya;
Set project settings to preference, typically I either change units from CM to meters (usually what size I work in is what I change depending on parameters of the project)
Grab a human body from the content browser in Maya to use for size reference
Insert an image plane via front facing orthographic view
After getting those few stepping stones down for setting up the project, I jump into the start of the block out.
While in front facing mode in Maya, I create a 3D plane, rotate it 90 degrees on the Y axis, then turn the subdivisions down from 10 to 1 for both width and height. This is to reduce the number of polygons right off the slot and give me more control with the polycount / edge constraints.
In the screenshot I included where it can be found to change subdivisions for both width and height in the attribute editor on the right hand side.

My thought process for the first phase of the block out was to get the basic wireframe I need to have a good starting point. From here I plan on moving edges / verts to get a more of the actual shape of these rocks. From there extrude the pieces out to give it a thickness.

Turning on the x-ray shading in the viewport options of Maya to see the image plane underneath the mesh I was modeling with
Turning on the x-ray shading in the viewport options of Maya to see the image plane underneath the mesh.
While starting the block out with the 3D plane in front facing view port, I make sure to go into the “Shading” panel and turn on “X-Ray”.
This shader turns down the opacity on all the materials of that viewport. So for instance if I turn this setting on in the front orthographic view in Maya then switch over to my perspective view port, the X-ray shader will not be enabled.
The X-ray shader is beneficial to create a base model off a flat reference image. This allows you to be able to easily see the image plane with the reference on it while being able to create and add geometry to 3D meshes.
Moving forward from where the block out is now, I plan on deleting the back faces of the entire mesh. Then mirror it so the sword is symmetrical, doing this workflow means I would only have to do half the amount of work for texturing and UVs.
These were the initial thoughts of how the process would go, and instead of staying on track with that idea, I wanted the sword to be a bit more unique since I wanted to showcase it as a hero asset. So I did utilize this to some extent, but ended up not mirroring the entire mesh as originally planned.

As you can see from the image above, there was quite a bit of difference in the silhouette throughout the process. Starting off with planes was a good idea in the sense of getting a front view accurate, but it really came to bite me in the rear making the entire mesh feel flat.
Therefore I went back to create the mesh to have more of a dynamic shape language. This time instead of starting off with planes, I broke down the concepts to its’ source shape and recreated the block out. This in turn gave a much more compelling silhouette and more accurate mid poly to start off with.

Something I also utilized, after getting primitive shapes in for the block out, was the lattice tool in Maya. This gave me the control to be able to scale verts and edges of the mesh.
Right below is a quick demo of how to access the lattice tool in Maya 2022.

How to apply a lattice in Maya 2022
With the use of the lattice tool and just making adjustments of the block out, it slowly became more prepared then the initial block out was.
After everything felt right with the shape and the silhouette of the block out, it was time to go through the model and start cleaning up the geometry. This will make getting into Zbrush for the high poly sculpt a much easier process.

Before; phase one of block outs wireframe & After; the wireframe of final block out
Getting into it: High Poly Sculpt

Here, I wanted to ensure I was able to recreate as much detail and emulate the raw materials of the sword. With there being quite a bit of organic sculpting in this project, it was one of the many reasons I wanted to pursue this particular prop. I wanted to push myself and get out of my comfort zone by focusing on that aspect of it all.
Below are images of the sculpting process I had flowed with. Below them are screen grabs of the individual brushes I utilize for each portion of the sculpt. I wanted to include these to demonstrate how I was able to initially create these.


Process of sculpt
The best way for myself to dive into the process was to break down each section by the materials I had planned out from the start of the project.
This gave me a more direct and clearer focus on smaller goals while working towards the larger end goal.
For the most part I found it quite relaxing doing the more hard surface sculpting. But when it came to the fleshy aspect of the sword, I found myself needing to consider the workflow I’ve done for tree and tree root sculpts as a base understanding of starting the portion. Then using reference from the gums of humans or animals to understand how it is in the real world was beneficial. I find that when I constantly am using reference and referring to the images I have already found, I feel less stumped in a project and much more productive in my workflow. I also found a couple of references I used to refer to how 3D artists use Zbrush / 3D sculpting to translate stylized props as such. I was constantly referring to Lydia Zanotti’s Nordic Axe to see how she was able to translate the sculpt as stylized.
The biggest take away from this portion of the project was just using my technical knowledge of Zbrush. Knowing when it was appropriate to use what tool / brush at what time.
Also making sure to check my orthographic views and the shape language is reading right. This was something I had to make sure the entire process to be checking as well. I find it quite easy to get off of track if I’m not using real world images to reference, as mentioned, and referring back to the original concept.
Once I have the sculpted details nice on the model, it’s time to remesh all of the subtools and export it back into Maya for low poly and UVs.
Let’s Go: Low Poly & UVs
Something that was always a struggle for me to get done in an efficient manner was working on the low poly and unwrapping then packing UVs. I took advantage of this project where I was able to hone in on specific parts of a workflow to be able to understand and focus on this aspect in a much clearer way. I’m also at a point in my career that I can understand how to properly ask a question of this subject. Taking this all into consideration I was able to learn quite a bit about UVs and retopping.
One of the biggest struggles I faced with this portion was understanding how to use the Quad Draw tool to my advantage in Maya. I have only used the tool a handful of times prior to this project so I didn’t fully understand how to use the tool to its full potential. With my mentor explaining to me that being able to switch in between the Quad Draw tool and using other tools in Maya such as the move tool, multi-cut tool, and whatever I may see fit for each situation was extremely powerful.
The first thing I do to start off any retopping of a prop is to make sure I lock the high poly sculpt, or the technical term for making the high poly is live in Maya.

Starting to use Quad Draw tool on Remeshed high poly sculpt
** Pro Tip ** Make sure when in the Quad Draw settings, to have the offset of the tool be about “.1”. This will have the low poly sit slightly above the mesh rather than sit directly on it. This will help when it comes to baking the low and high poly mesh since it will have some wiggle room to capture the details.
Once I get the scene set up to start using Quad Draw I’ll go in and start drawing right over the model. Going through each individual mesh and creating the low poly. For the most part this was all I did for the process of low poly besides after finishing up creating the low poly, just going through and straightening edges to have the geometry be much cleaner. This just has the wireframe appear more like a checker pattern and has the workflow of the UVs much easier.
This article I’m including states it’s for 3Ds Max, but I feel it’s relevant to any 3D program. I think it could give much more clarity if you care to dive deeper about the importance of clean geometry.

Process of Low Poly

Low poly & high poly meshes in Maya 2022
As soon as the low poly is all good to go and cleaned up, it’s time to jump into the beautiful 1x1 square. I was initially really intimidated by UVs because of how much the prop has organic features. Again the organic features is one of the many reasons I decided to pursue this prop, because how much out of my comfort zone it would have me be.
A nice reminder to always make sure BEFORE you start UVs, to delete your history and transform on the asset. Also something I learned that I’d like to utilize moving forward is making a UV seam cut at any 90 degree (or more intense) angle.
A brief breakdown of how I go about UVs is:
First I created a camera base projection in the UV editor of Maya
I then select desired edge that would be the least noticeable on the model, then cut the edge in the UV editor

In the editor I proceed to Unfold the model. There’s a couple of different ways to go about this, but my process is:
Right + Shift click in editor and select “Unfold” I then orient the UV shell in whatever way seems fit. Then in the toolbar I go to “Unfold” Tab and “Unfold Along” the U and V axis. I do this because it typically has the UV shell lay nicer
* Note: As mentioned there’s many different ways of unfolding the UV Shell, and you can also get the same result of the initial unfold under the “Unfold” tab in toolbar
With some of the UV shells, I went through and selected the edges and straightened them in the editor. This helps when it comes to packing the UVs into the 1x1 square. Plus it looks way nice
After doing that entire process with every mesh of the prop, I then started playing around with the texel density of the UV shells and began packing. Keeping in mind that whatever part of the mesh with the most details has the largest texel density. The larger the texel density the higher resolution the texture will have.
For instance in my case, I have the most details on the fleshy part of the sword so I need it to have the highest texel density (being the largest UV shells). When starting UV packing be sure to always start with the largest shells in the 1x1 square then start adding in the smaller shells. In most cases this is the more efficient way to pack rather than mindlessly going about it or starting with the smallest amount.
I like to think about UV packing similar to a game of Tetris. It can definitely be portrayed as the mundane aspect of 3D modeling. So perhaps giving it this perspective helps motivate an artist to tackle through the obstacle.

Process of UV packing & final UVs
Time to Bring it to Life: Bake & Texture
This is by far one of my favorite 3D processes. I really believe that this is the portion of the workflow that tends to give a model life and color. It can really change the entire feel and style of a project as well. Plus more times than not the workflow of baking and texturing seems to have the best balance of technical and creative abilities.
There were quite a few hurdles to jump over for this process. The biggest challenge was managing baking of the high poly to the low poly. A lot of the conflicts of baking came with overlapping UVs and naming conventions. The biggest take away from this process was understanding how to layer materials in Substance Painter.
Some of the biggest influences on my texturing process were:
Considering & studying the source of the material I’m emulating
Keeping to a stylized texture: Being subtle and layering materials on one another
What temperature are my highlights and shadows? Warm highlights & cool shadows? Or the other way around?
Constantly checking my values throughout the process

Something to note with naming conventions is the way you make sure everything is in order, perhaps considering a similar workflow to coding. This is at least specific towards if you are going to be baking in Substance Painter depending on the settings you use. A reason I had conflicts was mostly because of my naming conventions; it caused bleeding of the bake all throughout different parts of the mesh.
Examples of poor naming conventions:
sword_low1
sword_low2
sword_low3
Examples of good naming conventions:
sword_1_low
sword_2_low
sword_3_low
This article that dives a bit deeper about naming conventions with using Maya and Substance Painter. Also may clear up any bit of information a bit better since they have images representing what I just discussed. Again, I use this naming convention to help with the bleeding issues from other meshes with the bake.
Going back in the direction of texturing, after I had a couple of different base layers on the mesh I was then taking a render shot of the sword and then applying a black layer in Photoshop and changing the blending layer to Hue.
Why would I do this rather than just adding a black and white filter in Photoshop?
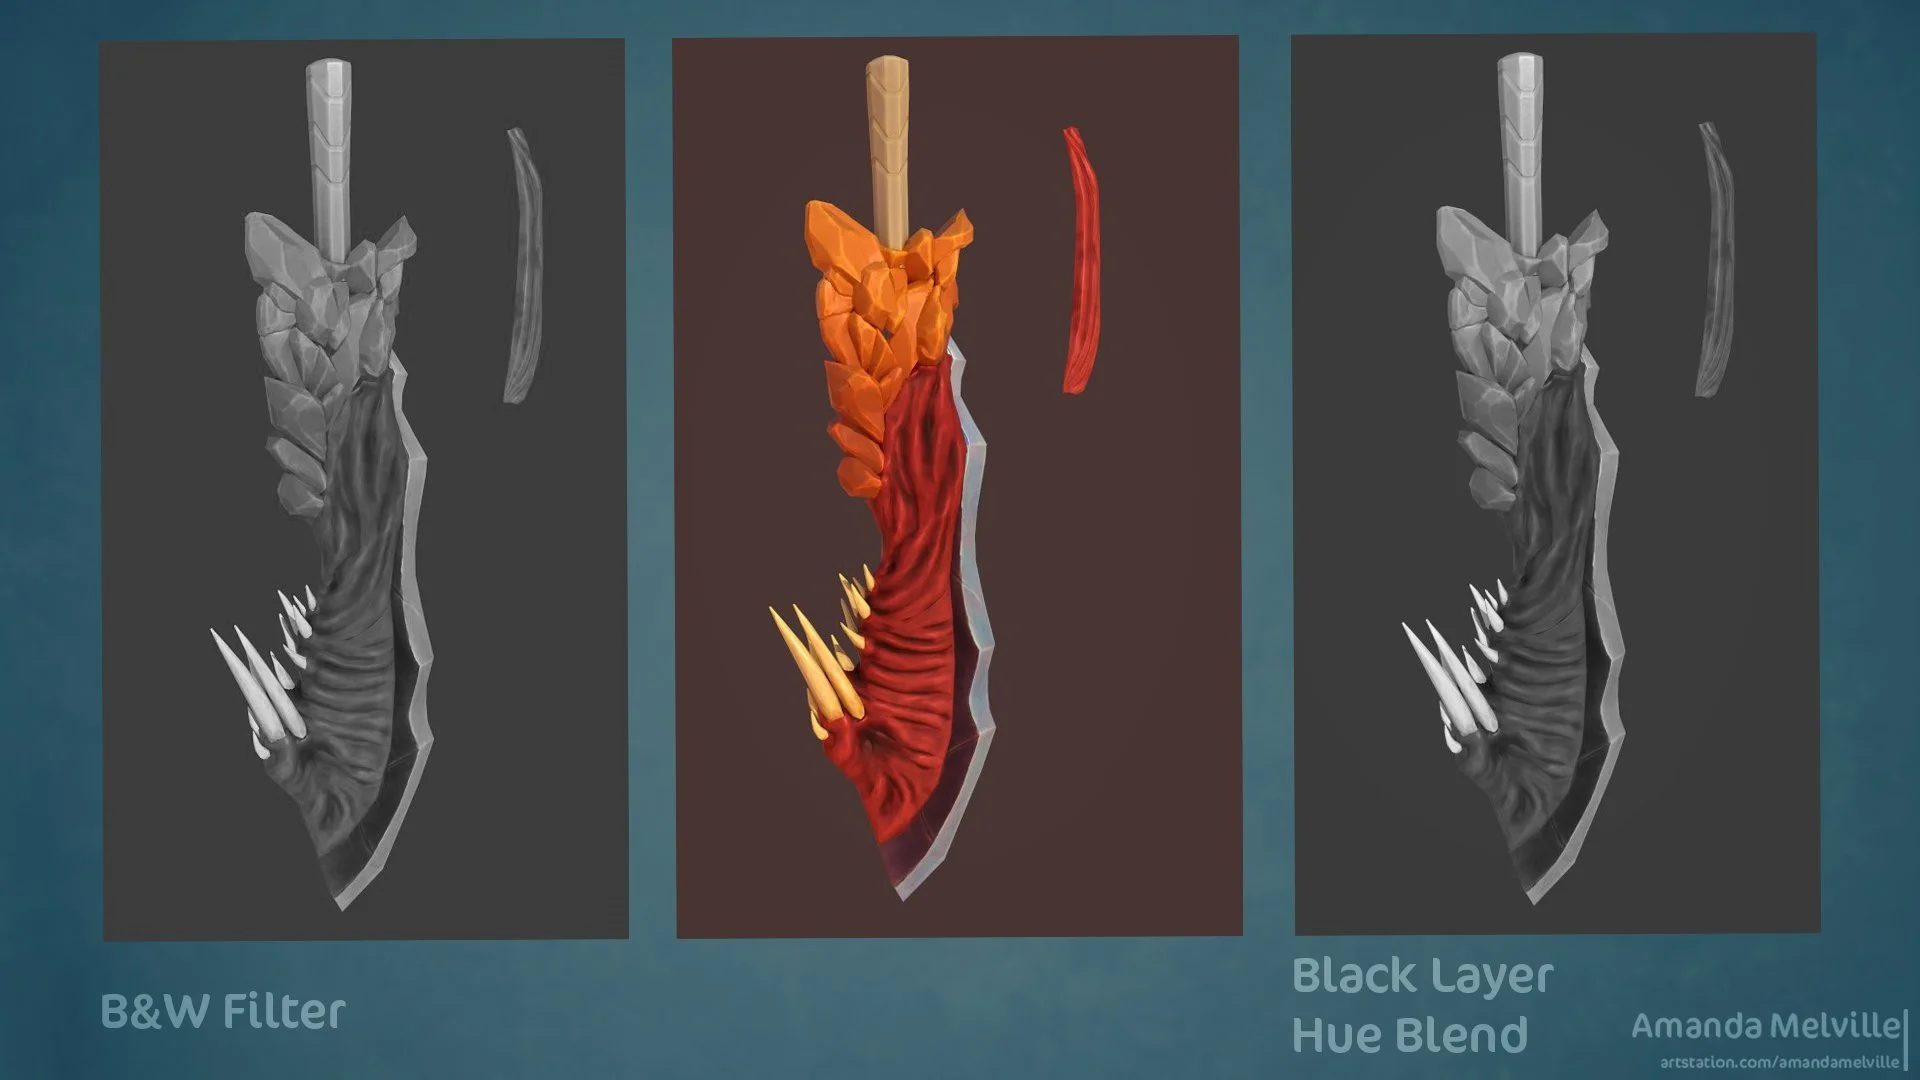
*Note* there is the slightest difference but the subtle difference really make the difference in the end
Seeing values in this manner is easier to see what’s working and what isn’t working in a project. This really shows where the eye is being drawn to and really showcases any hot spots or dark shadows. If I feel stuck or feel like I can push textures more, using this technique is beyond helpful to see the mesh at face value.
From here on out in the texturing process, I am constantly checking values after every work session, or more frequent. I really want to make sure I’m being mindful of what’s happening while texturing and this also helps me just step back and reflect on the project. Moving forward just adding layers in Substance Painter with additional base colors, metallic, roughness, and opacity. Utilizing the blend modes of the layers in Substance Painter, just as I would in Photoshop.

A huge benefit I used throughout the texturing process was utilizing either free tutorials or cost effective tutorials I had previously. The few I had constantly opened are referring to is:
Texturing a stylized sword with Substance Painter (stylized PBR) — Artstation Challenge By Fanny Vergne
Tutorial — Stylized Crystals in Marmoset TB3 by Dylan Mellott
Handpainted War Axe by Jasmin Habezai-Fekri
As I mentioned previously in the article, constantly using references and tutorials can really help break down your own work and see what does and doesn’t work. I tend to just have references I constantly am using just saved as either bookmarks or organized in a Miro page.
Creating the Scene: UE4
Last minute touches
Before jumping into Unreal, there is one thing left to do in Maya. As you may have noticed I did not have the cloth wrapped around the handle of the sword the entire time. This was because it was much more manageable and has more controlled geometry rather than just starting off with it attached to the handle.

I was able to get a lower geometry count because of this workflow, I was able to bake the cloth on an almost flat plane. Also I didn’t have to texture multiple pieces of the cloth, instead I got away with only texturing the one piece and using that throughout the model. This workflow could have also worked for the rock guard or the teeth extruding out of the side. Instead of making each one unique to itself, I could have just made a few instances of the rocks and put them on / in the model after the fact of baking and texturing.

Now getting into the best part, Unreal Engine!
First steps I take when setting up my scene in Unreal:
When exporting from Maya, make sure to that your units of modeling is in centimeters
Delete history and delete any transforms on the model in Maya. This DOES NOT center or change the pivot.
Making sure the pivot point is zeroed out in the world and set at the bottom of the mesh
If you want to know more specifics about getting an asset in engine, this article from techarthub dives deeper into it. I would suggest scrolling down to the section titled “Importing your asset into Unreal”, which breaks down the menu that pops up when you drag an asset in. Be mindful the image that’s posted in this section for import settings is specifically for animations.
Setting the Scene up in Engine

Before jumping into the lighting of the scene, I’m focusing on applying my textures I exported from Substance Painter in UE4. Something that I also focus on is naming conventions of my files. In my opinion, this is one of the most underrated skill sets to have, being able to organize and have files labeled.
Setting the materials up in UE4 is pretty streamline for the most part. You can of course mess with the settings however you choose, or play around with the nodes to create different effects or change the style of it this way. This is just the way I decided to move forward with the process.
I’m not sure if anyone else who creates textures in Substance Painter has this issue when applying it to a material in UE4, but I find that it always seems a bit too glossy. I found this tutorial (shows how to create it at 12:16) about applying a roughness control to the material that helped the render so much from not being as shiny.

In progress screenshot of material with roughness control, not finalized
I also wanted to slightly adjust the material crystals I did. I wanted to make sure they were really showcased and had a translucent material with a bright emissive effect to them. The way I did the crystals that are inside of the main crystals is linked in this tutorial. I also linked this previously for the texturing section on the crystals (note the texturing is in Marmoset Toolbag).
Background
I wanted to have just a plane sky sphere in the scene so I didn’t have to look at the HDRI in the background. This also made it easier for any edits needed for renders in Photoshop. Plus this just allowed me to be able to focus on the asset and not be distracted from other actors in the scene.
The background is a sphere with inverted normals from Maya 2020. I inverted the normals so I could scale up the sphere and use it as a background without seeing the inside of the mesh. As for the material all it is a new material with the settings in details changed:
Shading Model: Unlit (instead of Default Lit).
Then plugging a constant variable in the material blueprint (Hot key is 1+ RClick) and plugging it into Emissive Color. Then setting the constant to .1 so it isn’t just white. You can change the value as much as you wish, the higher the value the darker the material (1 = Black, 0 = White).

High resolution screenshot from UE4 (skysphere is visible)
Lighting
Lighting in unreal was never really my strong suit so I wanted to make sure I understood what lights do with settings and how I can control them. I also wanted to be effective with less lights rather than overload the scene with a bunch of point lights or rect lights that I have done previously in other projects.
Some lighting tutorials I used to learn more about lighting in UE4:
I also decided to use one of the content lighting levels in the content browser. I started off using “Adavanced_Lighting” in the starter content included in any project made in the engine. From there using the tutorials to push myself in the right direction of making adjustments to the scene.
I still used a few lights in the scene, but only three; two rectlights and a skylight, as well as using HDRIs.

Lighting in Unreal Engine 4
Skylight Settings:
The only thing I did for the skylight was applying a new HDRI under the Light-Cubemap settings and adjusting the intensity scale. I also wanted it to be more of an ambient light and decided to turn off case shadows (also in the Light column setting of the Skylight).
A great resource for free HDRIs is https://polyhaven.com/
Rect1 Settings:
Since I didn’t have a source of light besides ambient lighting, I wanted to add a light that gave some depth to the prop. There were only a couple of settings I adjusted under the Light section of the actor. I adjusted the Intensity to be 2, had a warmer tone for the light color, as well as adjusting the Attenuation Radius to be 199.
Rect2 Settings:
This light was specifically focused on just brightening up some shadows in some spots of the model. The only settings that were adjusted were the Intensity to .25 and having the light color be a warmer tone, the same as Rect1 settings.
Again I wanted to focus on being minimal but effective with the lighting in the scene. Nothing too dramatic, but rather lighting that captures the model in it’s true glory.
Post Process
I never really knew much about the post process volume. I knew that I always needed it in a scene, but never really had the opportunity prior to diving deep into it. I took the opportunity with this project to understand the capabilities of this actor in Unreal.
There was a few settings I adjusted in the volume which were:
I used this tutorial (starting at 39:35 in the video) which gave a much less daunting approach to the post process volume. I am drawn to this video because it goes over just a few aspects of it. Which for me was beneficial since I wasn’t interested in learning what everything does in the volume.

The adjustments I made to the Post Process Volume are:
Lens
I turned off any of the effects under the lens settings EXCEPT exposure. I kept the same settings on the exposure because otherwise adjusting the values on the Min Brightness and Max Brightness will blow the scene out. This will cause a gradual exposure that continues to get brighter in the scene.Rendering Features
Activating the Global Illumination settings then changing the Indirect Lighting hue to a warmer tone and changing the value to 50.
Turning on Ambient Occlusion and adjusted the values of the Intensity and Radius to what looked best in the scene
Ambient Cubemap I turned on all the settings and applied a HDRI to the cubemap texture. This gave me AO in the scene I wouldn’t have been able to achieve as efficiently with lighting. I then changed the tint to a cooler tone while decreasing the value of the Intensity to .4.Color Grading
Once the Lens and Rendering features are adjusted, then we can go in and adjust our color in the volume.
I activated Temperature with the Type being set to White Balance and the Temp being adjusted to a warmer tone.
Under the Misc, I turned on Color Grading LUT and it’s intensity. I purchased a LUT pack from the marketplace on Epic Game Store and downloaded the pack into the project. I went through all of the folders and narrowed down my options to what worked best, from there I adjusted the intensity of the LUT.
Here’s a link to the LUT pack I purchased from the Unreal Marketplace.
Cameras
Unreal’s “CineCameraActor” works wonders in so many scenarios. If you are at all familiar with taking professional photos or videos these settings will be perfect for you. Even if you don’t have a background in photography, you’ll only really need to be aware of a couple of settings.
Sticking to mostly changing the settings of Filmback settings with sensor width and sensor height. I also changed the Lens Settings and Focus Settings. I spent a lot of time learning more about Focus settings, specifically using the Manual Focus Distance eye dropper tool. From there making any necessary adjustments to have my mesh in focus the way I desire. Then adjusting the Current Focal Length and Current Aperture afterwards. I did this process with every render, seeing what works best for each case.

Rendering
Now this was the chance to really take advantage of UE4s capabilities with rendering. Previously I had only taken high resolution screenshots from the viewport and never understood why I wasn’t getting the quality renders I was looking for.
Let me say there is nothing wrong if you have a preference of using the high resolution screenshot option. Oftentimes I just found myself not pleased with the end product, and wanted to explore and utilize Unreal’s tools.
For rendering in UE4 I took the route of using a CineCamActor in the sequencer.
A quick overview of how I rendered using the sequencer:

Sequencer in UE4
Create a sequence by going to the top viewport of UE4. Cinematics — add level sequence.
Apply desired CineCamActor to the sequence
I set up each camera in the position I wanted to and adjusted the angle of the sword to what had the best composition.
Now this could be it to send up your render shot, but if you want to make a cinematic or have different shots with the same camera then I’ll do an overview how I went about that as well.
Putting the mesh into the sequencer
Creating desired length of the video
Creating a transform key on the static mesh (this tutorial at 6:02 dives deeper about setting transform keys in the sequencer)
Moving the sequencer slider in the timeline to next frame
Adjusting static mesh to a different render position of the camera and how ever many desired transformations in the sequencer
Now that setting up in the sequencer is done, let’s dive into the actual rendering aspect of this.

Curve editor in sequencer
*Note: Be sure to go to your Edit settings in the top toolbar. Then go to Edit-Plugins and type in “Movie render” and two plugins will pop up; Movie Render Queue and Movie Render Queue Additional Render Passes. Enable both of the plug-ins by checking the box. Be mindful you will have to restart Unreal Engine to have the plugins active
Movie Render Queue
After enabling the Movie Render Queue plugins, I started adjusting the settings. Here are some tutorials that I utilized are:
This one goes through the whole process of using the same technique I used for setting up renders with the sequencer
In the Movie Render Queue settings I made sure to enable PNG, anti-aliasing, and render details. I didn’t make any adjustments to the settings besides turning the anti-aliasing up from 1 to 64 in the second value box. This just gave more clear shots with less noise.
This article from Unreal breaks down the Movie Render Queue and what it is capable of.

Mask Material
Something I also did to make my life easier for when I go into Photoshop and do the last bit of touch up needed, I made a mask render in Unreal. Creating a mask in UE4 is quite helpful because it allows you to create and use a different background in photoshop or whichever program you may do an additional post process at.
There are many different ways to go about creating a mask from your render, this is just the workflow I decided to go with.
This process is pretty straightforward and the only extra work required is to make a new material.

Applying white emissive material for mask
Creating a new material and having the Shading Model in the material settings be set to unlit. Then adding a vector parameter with the value white and plugging this into the emissive. Super similar to how I explained how I create the background in UE4.
Turning off lights in scene for mask
After I’m done capturing my beauty shot of the prop, I then apply emissive white material to every shader on the model and turn off all the lights in the scene. I then will render this out the same way I rendered out the beauty shots.
Photoshop
Photoshop is where I do all my last touches with composition and setting up beauty renders. This tool makes combining images or using masks created from unreal much easier. Also it’s always nice to add some contact information or some type of watermark to your renders so if someone ever saves the image they know that it was created by you.
I won’t go too in depth with my post process in photoshop since this process can be quite subjective. But the main focus here is:

Mask & Render from UE4
Creating a background that has my render pop / complemented
Having a watermark
Composition
Saving my final render out with my name in it (i.e. amelville_demonsword_beautyrender)
Last Notes
Learning more about the importance of organization in any project seems mundane, but it truly can be powerful. Staying organized helped me throughout the project to stay motivated and retain any knowledge gained. It also helped keep me on top of documenting my progress throughout the project.

This video from FlippedNormals on YouTube has good practices of just general organization and structure of files. It is a good watch whether you’re not sure where to start with organization or even if you want to just see how others may structure their files.
Realizing how powerful capturing screenshots of any work done on a project has me able to reflect in a much more clear perspective. This project has shown me where in my workflow or an area of 3D pipeline that I can improve on and where I was the strongest at showcasing my capabilities.
Having a Miro page and being able to organize everything in a manner that works well for me was something that was a new experience. It was beneficial to be able to just throw any screenshots or renders into a web browser and be able to access it from anywhere I did work.

Self Reflecting
Out of every 3D work I’ve made so far, this is my most enriching. It has been so rewarding to reflect back at my process and understand how I did a specific workflow. Also, looking back at everything I had the opportunity to learn more about has been beneficial to retaining it all. Putting focus on the silhouette and the primitive shapes of the prop is something I’m going to make sure to be mindful of moving forward. I’m excited to also utilize this more polished skill set in Unreal Engine and see where I can take projects at, especially with rendering, lighting, and post process effects.
I’m beyond grateful and humbled to be able to put this blog together about the process of this project. I gained more knowledge with creating high definition renders in UE4, understanding more optimal workflows, and creating stylized PBR textures.
A huge shout out to Adam Serhane for helping me through this entire project and guiding me in a way that pushes my abilities and growth as an artist.
Thank you for taking the time to read! Please be sure to check out the many great resources I have linked in this post.

Amanda Melville, 3D Environment / Prop Artist
Contact Info
amandamelville00@gmail.com